
Androidのプログラミング – 投稿 5: LinearLayooutとのインタフェースの設計
私が言ったように、以前のポスト, LinearLayoutのViewGroup他のビューが含まれており、水平または垂直に管理されています (これは、依存して規定されています). だから同じように、私たちは並んで, 水平または垂直に配置され. だから我々はインターフェイスを処理するために非常に簡単のLinearLayoutを使用する場合、. 今、私たちは、技能を持つアプリケーションのためのいくつかのインターフェイスのデザインを練習に行くのLinearLayout.
[qads]
コンテンツ
1. LinearLayoutでログインインターフェース設計
このインタフェースは、我々があった前の日です RelativeLayoutを使用して設計 単に, 今のLinearLayout星を見に適用しよう.
私たちは、次のインターフェイスを思い出します:

このような, 私たちは、このインターフェイスが上から下に並んでいる要素が含まれていることを私の心に思い描きます. あなたは、次のコードを参照してください。:
<?xml version="1.0" encoding="utf-8"?>
<LinearLayout xmlns:android="http://schemas.android.com/apk/res/android"
    android:layout_width="match_parent"
    android:layout_height="match_parent"
    android:orientation="vertical">

    <TextView
        android:id="@+id/tvLogin"
        android:layout_width="wrap_content"
        android:layout_height="wrap_content"
        android:layout_gravity="center"
        android:text="Login"
        android:textSize="24sp" />

    <TextView
        android:id="@+id/tvUser"
        android:layout_width="wrap_content"
        android:layout_height="wrap_content"
        android:text="user" />

    <EditText
        android:id="@+id/editUser"
        android:layout_width="match_parent"
        android:layout_height="wrap_content" />

    <TextView
        android:id="@+id/tvPassword"
        android:layout_width="wrap_content"
        android:layout_height="wrap_content"
        android:text="password" />

    <EditText
        android:id="@+id/editPassword"
        android:layout_width="match_parent"
        android:layout_height="wrap_content" />

    <Button
        android:id="@+id/btnOk"
        android:layout_width="wrap_content"
        android:layout_height="wrap_content"
        android:layout_gravity="center"
        android:text="ok" />

</LinearLayout>
このコードを使用すると、前日と同様のインターフェースを持ち、上記と同様の.

あなたは上記のコードでは、次の属性のいくつかに気づきました:
最初のLinearLayoutカード
アンドロイド:向き=”垂直” : LinearLayoutと, それは、垂直方向と水平方向のインターフェースを管理します. キー属性 オリエンテーション その中にこの規則は、次元の要素. 垂直に沿ってになります と 水平水平になります.
タグとタグのTextViewログインボタンが続きます
アンドロイド:layout_gravity =”センター”: この属性は、そのオブジェクトのレイアウトのすべてを作るための責任があります (TextViewのログインVAボタン) 中央に配置され. それは、フレームのすべての部分が中央に配置されていないリテラルな内容だけです それが中央に配置され. あなたは、私たちは同じような属性がある持っている他の日を覚えています アンドロイド:重力, その途中で、オブジェクトの内容を整列します.
ですから、私たちのインターフェイスとは異なる方法を考えることができます. それは間でのLinearLayoutコンテンツ内部のカードのためのものです. だから我々はのTextViewとButtonログイン[OK]をはるかに整列する必要はありませんので、ちょうど彼ら水平に十分なコンテンツが中であるために. 彼らはそれ内にあるため、自分たちの中でそれを彫刻すると、元のコンテンツのLinearLayoutでのLinearLayout, しかし、中間とのLinearLayoutでそれの内容. しかしのTextViewのTextViewのユーザとパスワードは、そうでなければ、我々が間に行っていることになるので、水平方向の国歌は、画面を摘み取ら調整する必要があります. このようなコードは次のようになります:
<?xml version="1.0" encoding="utf-8"?>
<LinearLayout xmlns:android="http://schemas.android.com/apk/res/android"
    android:layout_width="match_parent"
    android:layout_height="match_parent"
    android:gravity="center"
    android:orientation="vertical">

    <TextView
        android:id="@+id/tvLogin"
        android:layout_width="wrap_content"
        android:layout_height="wrap_content"
        android:text="Login"
        android:textSize="24sp" />

    <TextView
        android:id="@+id/tvUser"
        android:layout_width="match_parent"
        android:layout_height="wrap_content"
        android:text="user" />

    <EditText
        android:id="@+id/editUser"
        android:layout_width="match_parent"
        android:layout_height="wrap_content" />

    <TextView
        android:id="@+id/tvPassword"
        android:layout_width="match_parent"
        android:layout_height="wrap_content"
        android:text="password" />

    <EditText
        android:id="@+id/editPassword"
        android:layout_width="match_parent"
        android:layout_height="wrap_content" />

    <Button
        android:id="@+id/btnOk"
        android:layout_width="wrap_content"
        android:layout_height="wrap_content"
        android:text="ok" />

</LinearLayout>
ここでは所望のようにあなたは私たちのインターフェイスが中央に配置される要素から成るでしょう. 一つだけは、以下に示すように、すべての要素が垂直方向に中央にあります:

それはプロパティためです アンドロイド:重力=”センター” 最新に従って水平方向と垂直方向の途中でのLinearLayoutの内容については責任を負いませんです (センター). この特性を克服するために、, あなたがして、値の中心を変更します center_horizontal 水平中心, 我々は、垂直方向に中央をしたくないので. その他の記事では、垂直方向の中心を使用する場合があり、値を使用します center_vertical.
2. インタフェースデザイン電卓 (電卓) LinearLayoutによります
私たちは、コミュニティ機能を備えたポケットコンピュータをしようとします, マイナス, プレス, 基本的な分割オフライン. より良いあなたは、そのインターフェイスを作るために気に, それはいつもだように、すべての後、私はマシンのハンドリングを完璧に練習を行いますので、.
私たちは今、フォルダを右クリックしてみましょう /RES / layoout - >新しい - >レイアウトリソースファイル - >Đặtファイルラlayout_calculator.xml TEN - > OK そして、それを開きます.
次のように我々は、このコンピュータは、機能と基本的な形で想像します:

このような, 次のように我々は、レイアウトやレイアウトを使用することを計画します:

そこから, 我々は、次のコードを持っています:
<?xml version="1.0" encoding="utf-8"?>
<LinearLayout xmlns:android="http://schemas.android.com/apk/res/android"
    android:layout_width="match_parent"
    android:layout_height="match_parent"
    android:orientation="vertical">

    <LinearLayout
        android:layout_width="match_parent"
        android:layout_height="wrap_content"
        android:orientation="vertical"
        android:padding="8dp">

        <TextView
            android:id="@+id/tvMath"
            android:layout_width="match_parent"
            android:layout_height="wrap_content"
            android:gravity="right|center_vertical"
            android:minHeight="48dp"
            android:text="0"
            android:textSize="24sp" />

        <TextView
            android:id="@+id/tvResult"
            android:layout_width="match_parent"
            android:layout_height="wrap_content"
            android:gravity="right|center_vertical"
            android:minHeight="48dp"
            android:text="0"
            android:textSize="24sp" />

    </LinearLayout>

    <LinearLayout
        android:layout_width="match_parent"
        android:layout_height="wrap_content"
        android:orientation="horizontal">

        <Button
            android:id="@+id/btnC"
            android:layout_width="wrap_content"
            android:layout_height="match_parent"
            android:text="C"
            android:textSize="20sp" />

        <Button
            android:id="@+id/btnOpen"
            android:layout_width="wrap_content"
            android:layout_height="match_parent"
            android:text="("
            android:textSize="20sp" />

        <Button
            android:id="@+id/btnClose"
            android:layout_width="wrap_content"
            android:layout_height="match_parent"
            android:text=")"
            android:textSize="20sp" />

        <Button
            android:id="@+id/btnDiv"
            android:layout_width="wrap_content"
            android:layout_height="match_parent"
            android:text="/"
            android:textSize="20sp" />
    </LinearLayout>

    <LinearLayout
        android:layout_width="match_parent"
        android:layout_height="wrap_content"
        android:orientation="horizontal">

        <Button
            android:id="@+id/btn7"
            android:layout_width="wrap_content"
            android:layout_height="match_parent"
            android:text="7"
            android:textSize="20sp" />

        <Button
            android:id="@+id/btn8"
            android:layout_width="wrap_content"
            android:layout_height="match_parent"
            android:text="8"
            android:textSize="20sp" />

        <Button
            android:id="@+id/btn9"
            android:layout_width="wrap_content"
            android:layout_height="match_parent"
            android:text="9"
            android:textSize="20sp" />

        <Button
            android:id="@+id/btnMul"
            android:layout_width="wrap_content"
            android:layout_height="match_parent"
            android:text="*"
            android:textSize="20sp" />
    </LinearLayout>

    <LinearLayout
        android:layout_width="match_parent"
        android:layout_height="wrap_content"
        android:orientation="horizontal">

        <Button
            android:id="@+id/btn4"
            android:layout_width="wrap_content"
            android:layout_height="match_parent"
            android:text="4"
            android:textSize="20sp" />

        <Button
            android:id="@+id/btn5"
            android:layout_width="wrap_content"
            android:layout_height="match_parent"
            android:text="5"
            android:textSize="20sp" />

        <Button
            android:id="@+id/btn6"
            android:layout_width="wrap_content"
            android:layout_height="match_parent"
            android:text="6"
            android:textSize="20sp" />

        <Button
            android:id="@+id/btnSub"
            android:layout_width="wrap_content"
            android:layout_height="match_parent"
            android:text="-"
            android:textSize="20sp" />
    </LinearLayout>

    <LinearLayout
        android:layout_width="match_parent"
        android:layout_height="wrap_content"
        android:orientation="horizontal">

        <Button
            android:id="@+id/btn1"
            android:layout_width="wrap_content"
            android:layout_height="match_parent"
            android:text="1"
            android:textSize="20sp" />

        <Button
            android:id="@+id/btn2"
            android:layout_width="wrap_content"
            android:layout_height="match_parent"
            android:text="2"
            android:textSize="20sp" />

        <Button
            android:id="@+id/btn3"
            android:layout_width="wrap_content"
            android:layout_height="match_parent"
            android:text="3"
            android:textSize="20sp" />

        <Button
            android:id="@+id/btnPlus"
            android:layout_width="wrap_content"
            android:layout_height="match_parent"
            android:text="+"
            android:textSize="20sp" />
    </LinearLayout>

    <LinearLayout
        android:layout_width="match_parent"
        android:layout_height="wrap_content"
        android:orientation="horizontal">

        <Button
            android:id="@+id/btn0"
            android:layout_width="wrap_content"
            android:layout_height="match_parent"
            android:text="0"
            android:textSize="20sp" />

        <Button
            android:id="@+id/btnDot"
            android:layout_width="wrap_content"
            android:layout_height="match_parent"
            android:text="."
            android:textSize="20sp" />

        <Button
            android:id="@+id/btnResult"
            android:layout_width="wrap_content"
            android:layout_height="match_parent"
            android:text="="
            android:textSize="20sp" />

    </LinearLayout>

</LinearLayout>
そこから私たちは、基本的には次のフレームを持っています

あなたは私たちのコードが非常に長い気づいていますが、全く同じ基本的なボタン, あなたが行います 1 ボタンと行をコピー 5 顧客は非常に迅速になります.
あなたはそれを見つけるだろうビジュアルプレビューインターフェイスは、私たちの希望ではありません, 水平方向の画面が表示し、次のようにインターフェイスがあるでしょう場合でも、:

だから我々はどのように克服する方法を見つける必要があります:
– ボタンが画面いっぱいに十分に間隔を置いたと同じサイズと水平にしています, riêngボタン結果 (ログイン) それは等しい面積を占有します 2 倍速ボタン.
– 均等に行を間隔を置いて配置し、垂直方向に画面を埋めます.
のボタンを達成するために 1 我々はプロパティを使用し、画面を埋めるために、水平方向の同サイズの行と アンドロイド:layout_weight. 加重平均重量. すなわち、我々はの重要な要素に基づいて設計します – サイズ比. ボタンと同じサイズにし、水平方向にこぼれます, 我々は彼らに等しい重みを与えます. 例えば、最初の行は、我々は次のコードを持っています:
<LinearLayout
        android:layout_width="match_parent"
        android:layout_height="wrap_content"
        android:orientation="horizontal">

        <Button
            android:id="@+id/btnC"
            android:layout_width="wrap_content"
            android:layout_height="match_parent"
            android:layout_weight="1"
            android:text="C"
            android:textSize="20sp" />

        <Button
            android:id="@+id/btnOpen"
            android:layout_width="wrap_content"
            android:layout_height="match_parent"
            android:layout_weight="1"
            android:text="("
            android:textSize="20sp" />

        <Button
            android:id="@+id/btnClose"
            android:layout_width="wrap_content"
            android:layout_height="match_parent"
            android:layout_weight="1"
            android:text=")"
            android:textSize="20sp" />

        <Button
            android:id="@+id/btnDiv"
            android:layout_width="wrap_content"
            android:layout_height="match_parent"
            android:layout_weight="1"
            android:text="/"
            android:textSize="20sp" />
    </LinearLayout>
LinearLayoutの父は横のボタンであるため, 属性必要があります アンドロイド:layout_weight 水平に適用されます. 垂直のLinearLayoutの場合, この属性は、要素の垂直方向に適用されます.
そして、我々はあなたが持っているモードがあまりにも縦または横画面を回転させるのに、このインターフェイスのようなものでした, まだ美しいです.

しかし、多くの場合, あなたがそれらに等しい重みを与えるとき, しかし長い間、ボタンのテキストが、それらは異なるサイズを有します, あなたはこのような長い括弧を開くには、ボタンのテキストを修正しようとすることができます.

その理由は、プロパティということです アンドロイド:layout_width 価値があります wrap_content それが持続するだけで十分なコンテンツを必要と.
完全に一致、それを修正するには, 水平方向ボタンの大きさのためにあなた 0DP. ここでは、私たちの父は、水平方向であるため、サイズが水平にレイアウト0dpを使用している気づきます, 父は縦レイアウトであれば、我々は0dpによって垂直要素のサイズを与えなければなりません.
次のように最初の行の完全なコードは次のようになります:
<LinearLayout
        android:layout_width="match_parent"
        android:layout_height="wrap_content"
        android:orientation="horizontal">

        <Button
            android:id="@+id/btnC"
            android:layout_width="0dp"
            android:layout_height="match_parent"
            android:layout_weight="1"
            android:text="C"
            android:textSize="20sp" />

        <Button
            android:id="@+id/btnOpen"
            android:layout_width="0dp"
            android:layout_height="match_parent"
            android:layout_weight="1"
            android:text="("
            android:textSize="20sp" />

        <Button
            android:id="@+id/btnClose"
            android:layout_width="0dp"
            android:layout_height="match_parent"
            android:layout_weight="1"
            android:text=")"
            android:textSize="20sp" />

        <Button
            android:id="@+id/btnDiv"
            android:layout_width="0dp"
            android:layout_height="match_parent"
            android:layout_weight="1"
            android:text="/"
            android:textSize="20sp" />
    </LinearLayout>
私たちは同じことを次の行. もう一つは、そのボタンであります, 我々はそれをサイズの折り畳みを与える必要があります 2 他の回ボタン, そこで私は、その重量を配置します 2. ここに私たちの新しいインターフェイス:

次に、行の高さにこれを行う必要があります等しく、画面を埋め. 同様のアイデアが思いつきました. 私たちは、その項目の重みを設定します, すなわち設定 アンドロイド:LinearLayoutのためlayout_weight お互いに沿って. しかし、注意, それらを含有する父のレイアウトは垂直方向の寸法であります, だから我々は、配置する必要があります アンドロイド:layout_height =”0DP”.
次のように最後に、私たちのインターフェースが標準化されます:

次のコードで:
<?xml version="1.0" encoding="utf-8"?>
<LinearLayout xmlns:android="http://schemas.android.com/apk/res/android"
    android:layout_width="match_parent"
    android:layout_height="match_parent"
    android:orientation="vertical">

    <LinearLayout
        android:layout_width="match_parent"
        android:layout_height="wrap_content"
        android:orientation="vertical"
        android:padding="8dp">

        <TextView
            android:id="@+id/tvMath"
            android:layout_width="match_parent"
            android:layout_height="wrap_content"
            android:gravity="right|center_vertical"
            android:minHeight="48dp"
            android:text="0"
            android:textSize="24sp" />

        <TextView
            android:id="@+id/tvResult"
            android:layout_width="match_parent"
            android:layout_height="wrap_content"
            android:gravity="right|center_vertical"
            android:minHeight="48dp"
            android:text="0"
            android:textSize="24sp" />

    </LinearLayout>

    <LinearLayout
        android:layout_width="match_parent"
        android:layout_height="0dp"
        android:layout_weight="1"
        android:orientation="horizontal">

        <Button
            android:id="@+id/btnC"
            android:layout_width="0dp"
            android:layout_height="match_parent"
            android:layout_weight="1"
            android:text="C"
            android:textSize="20sp" />

        <Button
            android:id="@+id/btnOpen"
            android:layout_width="0dp"
            android:layout_height="match_parent"
            android:layout_weight="1"
            android:text="("
            android:textSize="20sp" />

        <Button
            android:id="@+id/btnClose"
            android:layout_width="0dp"
            android:layout_height="match_parent"
            android:layout_weight="1"
            android:text=")"
            android:textSize="20sp" />

        <Button
            android:id="@+id/btnDiv"
            android:layout_width="0dp"
            android:layout_height="match_parent"
            android:layout_weight="1"
            android:text="/"
            android:textSize="20sp" />
    </LinearLayout>

    <LinearLayout
        android:layout_width="match_parent"
        android:layout_height="0dp"
        android:layout_weight="1"
        android:orientation="horizontal">

        <Button
            android:id="@+id/btn7"
            android:layout_width="0dp"
            android:layout_height="match_parent"
            android:layout_weight="1"
            android:text="7"
            android:textSize="20sp" />

        <Button
            android:id="@+id/btn8"
            android:layout_width="0dp"
            android:layout_height="match_parent"
            android:layout_weight="1"
            android:text="8"
            android:textSize="20sp" />

        <Button
            android:id="@+id/btn9"
            android:layout_width="0dp"
            android:layout_height="match_parent"
            android:layout_weight="1"
            android:text="9"
            android:textSize="20sp" />

        <Button
            android:id="@+id/btnMul"
            android:layout_width="0dp"
            android:layout_height="match_parent"
            android:layout_weight="1"
            android:text="*"
            android:textSize="20sp" />
    </LinearLayout>

    <LinearLayout
        android:layout_width="match_parent"
        android:layout_height="0dp"
        android:layout_weight="1"
        android:orientation="horizontal">

        <Button
            android:id="@+id/btn4"
            android:layout_width="0dp"
            android:layout_height="match_parent"
            android:layout_weight="1"
            android:text="4"
            android:textSize="20sp" />

        <Button
            android:id="@+id/btn5"
            android:layout_width="0dp"
            android:layout_height="match_parent"
            android:layout_weight="1"
            android:text="5"
            android:textSize="20sp" />

        <Button
            android:id="@+id/btn6"
            android:layout_width="0dp"
            android:layout_height="match_parent"
            android:layout_weight="1"
            android:text="6"
            android:textSize="20sp" />

        <Button
            android:id="@+id/btnSub"
            android:layout_width="0dp"
            android:layout_height="match_parent"
            android:layout_weight="1"
            android:text="-"
            android:textSize="20sp" />
    </LinearLayout>

    <LinearLayout
        android:layout_width="match_parent"
        android:layout_height="0dp"
        android:layout_weight="1"
        android:orientation="horizontal">

        <Button
            android:id="@+id/btn1"
            android:layout_width="0dp"
            android:layout_height="match_parent"
            android:layout_weight="1"
            android:text="1"
            android:textSize="20sp" />

        <Button
            android:id="@+id/btn2"
            android:layout_width="0dp"
            android:layout_height="match_parent"
            android:layout_weight="1"
            android:text="2"
            android:textSize="20sp" />

        <Button
            android:id="@+id/btn3"
            android:layout_width="0dp"
            android:layout_height="match_parent"
            android:layout_weight="1"
            android:text="3"
            android:textSize="20sp" />

        <Button
            android:id="@+id/btnPlus"
            android:layout_width="0dp"
            android:layout_height="match_parent"
            android:layout_weight="1"
            android:text="+"
            android:textSize="20sp" />
    </LinearLayout>

    <LinearLayout
        android:layout_width="match_parent"
        android:layout_height="0dp"
        android:layout_weight="1"
        android:orientation="horizontal">

        <Button
            android:id="@+id/btn0"
            android:layout_width="0dp"
            android:layout_height="match_parent"
            android:layout_weight="1"
            android:text="0"
            android:textSize="20sp" />

        <Button
            android:id="@+id/btnDot"
            android:layout_width="0dp"
            android:layout_height="match_parent"
            android:layout_weight="1"
            android:text="."
            android:textSize="20sp" />

        <Button
            android:id="@+id/btnResult"
            android:layout_width="0dp"
            android:layout_height="match_parent"
            android:layout_weight="2"
            android:text="="
            android:textSize="20sp" />
    </LinearLayout>

</LinearLayout>
この記事では、ここでは比較的長いですし、, 私はまだあなたがインターフェースはのLinearLayoutとチャット設計しようとする方法を案内したいです. 事前に彼の日のLinearLayoutによって行われますが、最後のことができない存在しますので、, 顔に共有を通じて, 私はこれはかなり良いトリックを知っていました.
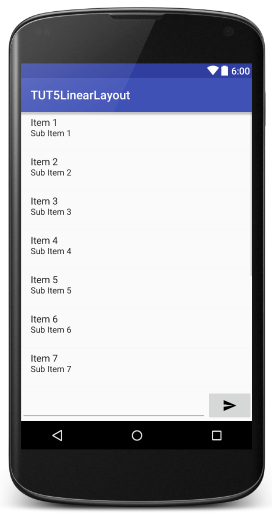
3. LinearLayoutによるチャットインターフェイスのデザイン
RelativeLayoutすべて前日チャットインターフェイスのデザインとして、, 我々はインターフェイスを可視化.

作成した新しいレイアウトファイルはオフラインのための電卓レイアウトファイルを作成するようなものです.
このような, 基本的には以下の構成を手配することができます:

その中で, 我々はまた、プロパティを使用する必要があります。 重量 正確に画面の種類はどのようにサイズを知らないのインタフェース速度を分割します.
– リストビュー会計 9 断面高さ
– LayoutInput会計 1 断面高さ
– EditTextの会計でLayoutInput 4 一部, 会計ボタンを送ります 1 一部.
<?xml version="1.0" encoding="utf-8"?>
<LinearLayout xmlns:android="http://schemas.android.com/apk/res/android"
    android:layout_width="match_parent"
    android:layout_height="match_parent"
    android:orientation="vertical">

    <ListView
        android:id="@+id/lvChat"
        android:layout_width="match_parent"
        android:layout_height="0dp"
        android:layout_weight="9" />

    <LinearLayout
        android:layout_width="match_parent"
        android:layout_height="0dp"
        android:layout_weight="1"
        android:orientation="horizontal">

        <EditText
            android:id="@+id/editChat"
            android:layout_width="0dp"
            android:layout_height="match_parent"
            android:layout_weight="4" />

        <ImageButton
            android:id="@+id/btnSend"
            android:layout_width="0dp"
            android:layout_height="match_parent"
            android:layout_weight="1"
            android:src="@drawable/ic_send" />
    </LinearLayout>
</LinearLayout>
とても美しい見て、私たちが望むような標準, しかし、あなたは、画面を水平に回転させる場合は、次のように表示されます:

お分かりのように, LayoutInput部分は赤ちゃんを縮小します, 回転させたときのため, それだけを占めて高さが減少 1 セクションが少しあることと、フォーカスを失うべきです, 失われた手紙. 送信ボタンをも水平方向に膨らみを残しています.
克服するために、, 我々は唯一の高さwrap_content LayoutInputを置くために体重をかけないでください, 送信ボタンの幅はばかりwrap_contentを入れて体重をかけていませんでした. そして、オブジェクトが送信ボタンをので、, いいえ重みないLayoutInput, あなたが特定のキーの任意の数を残すことができますので、ListViewコントロールとEditTextの, 私はそのような 1.
<?xml version="1.0" encoding="utf-8"?>
<LinearLayout xmlns:android="http://schemas.android.com/apk/res/android"
    android:layout_width="match_parent"
    android:layout_height="match_parent"
    android:orientation="vertical">

    <ListView
        android:id="@+id/lvChat"
        android:layout_width="match_parent"
        android:layout_height="0dp"
        android:layout_weight="1" />

    <LinearLayout
        android:layout_width="match_parent"
        android:layout_height="wrap_content"
        android:orientation="horizontal">

        <EditText
            android:id="@+id/editChat"
            android:layout_width="0dp"
            android:layout_height="match_parent"
            android:layout_weight="1" />

        <ImageButton
            android:id="@+id/btnSend"
            android:layout_width="wrap_content"
            android:layout_height="match_parent"
            android:src="@drawable/ic_send" />
    </LinearLayout>
</LinearLayout>
あなたが画面内かどうかを確認するインターフェイス, 規模の大小を問わ, 水平または垂直、それはより上のように破壊されることはありません. 非常においしい桃の枝. ^^.
あなたはコメントやレビューをお持ちの場合, 何の質問, あなたは、以下にコメントしてくださいだろう.


彼の素晴らしい記事, 初心者に理解することは非常に簡単, 私はこのシリーズTruyを望みます.
ありがとう, 彼の健康を望みます.
ありがとう. オフラインで友達と共有してください.
親愛なる友人, 全部で 4 と 5 この, あなたのコードが完了すると、ファイルMainActivity.java setContentViewを変換します(R.layout.activity_main); setContentView(R.layout.layout_calculator); その後、すべての致命的な例外マップエラー: メイン….. 停止したBIアプリケーションエラーを実行します。. それを修正するには、どのようにハァッ?
あなたは正しいインターフェイスファイルを作成していないか分からないのですか?